 PDF to Word
 PDF to Excel
 PDF to HTML
 PDF to Text
 PDF to PDF/A
 PDF to PowerPoint
 PDF to JPG
 HEIC to JPG
 PDF to PNG
 OCR Converter
 Word to PDF
 JPG to PDF
 Excel to PDF
 PDF Converter
 PNG to PDF
 PowerPoint to PDF
 DICOM to PDF
 Merge PDF
 Split PDF
 Delete Pages
 Rotate PDF
 Rearrange PDF
 PDF Editor
 Crop PDF
 DOCX Editor
 Edit PDF Text
 Compress PDF
 Sign PDF
 Redact PDF
 Fill in PDF Forms
 Flatten PDF
 Annotate PDF
 ASK PDF
 PDF Compare
 PDF Viewer
 Office Viewer
 Text Compare
 Validate PDF/A
How to Password Protect a PDF on Mac
Sept 5 2025
Productivity


5 min
Share this post
This step-by-step guide walks you through two fast, reliable ways to password protect your PDF files on macOS, using tools you already have (Preview) or can easily install (Xodo PDF Studio).
Need to secure private or confidential documents on your Mac?
In this guide, you'll learn how to password protect a PDF on Mac using:
- Preview, the built-in app for quick protection.
- Xodo PDF Studio, a PDF editor for advanced encryption and flattening options.
You’ll also learn how to remove passwords and get answers to common questions about protecting PDFs on macOS.
Use the Preview app for quick protection
One of the fastest ways to lock your PDF on Mac is by using Preview.
This method works well for basic protection, like requiring a password to open the file or limiting who can print or copy from it.
Since the Preview app comes pre-installed, you won’t need to download anything.
Steps to password protect a PDF with Preview
- Open your PDF in Preview.
Locate the PDF you want to protect and double-click to open it in Preview. If another app launches, right-click the file, choose Open With, then select Preview.
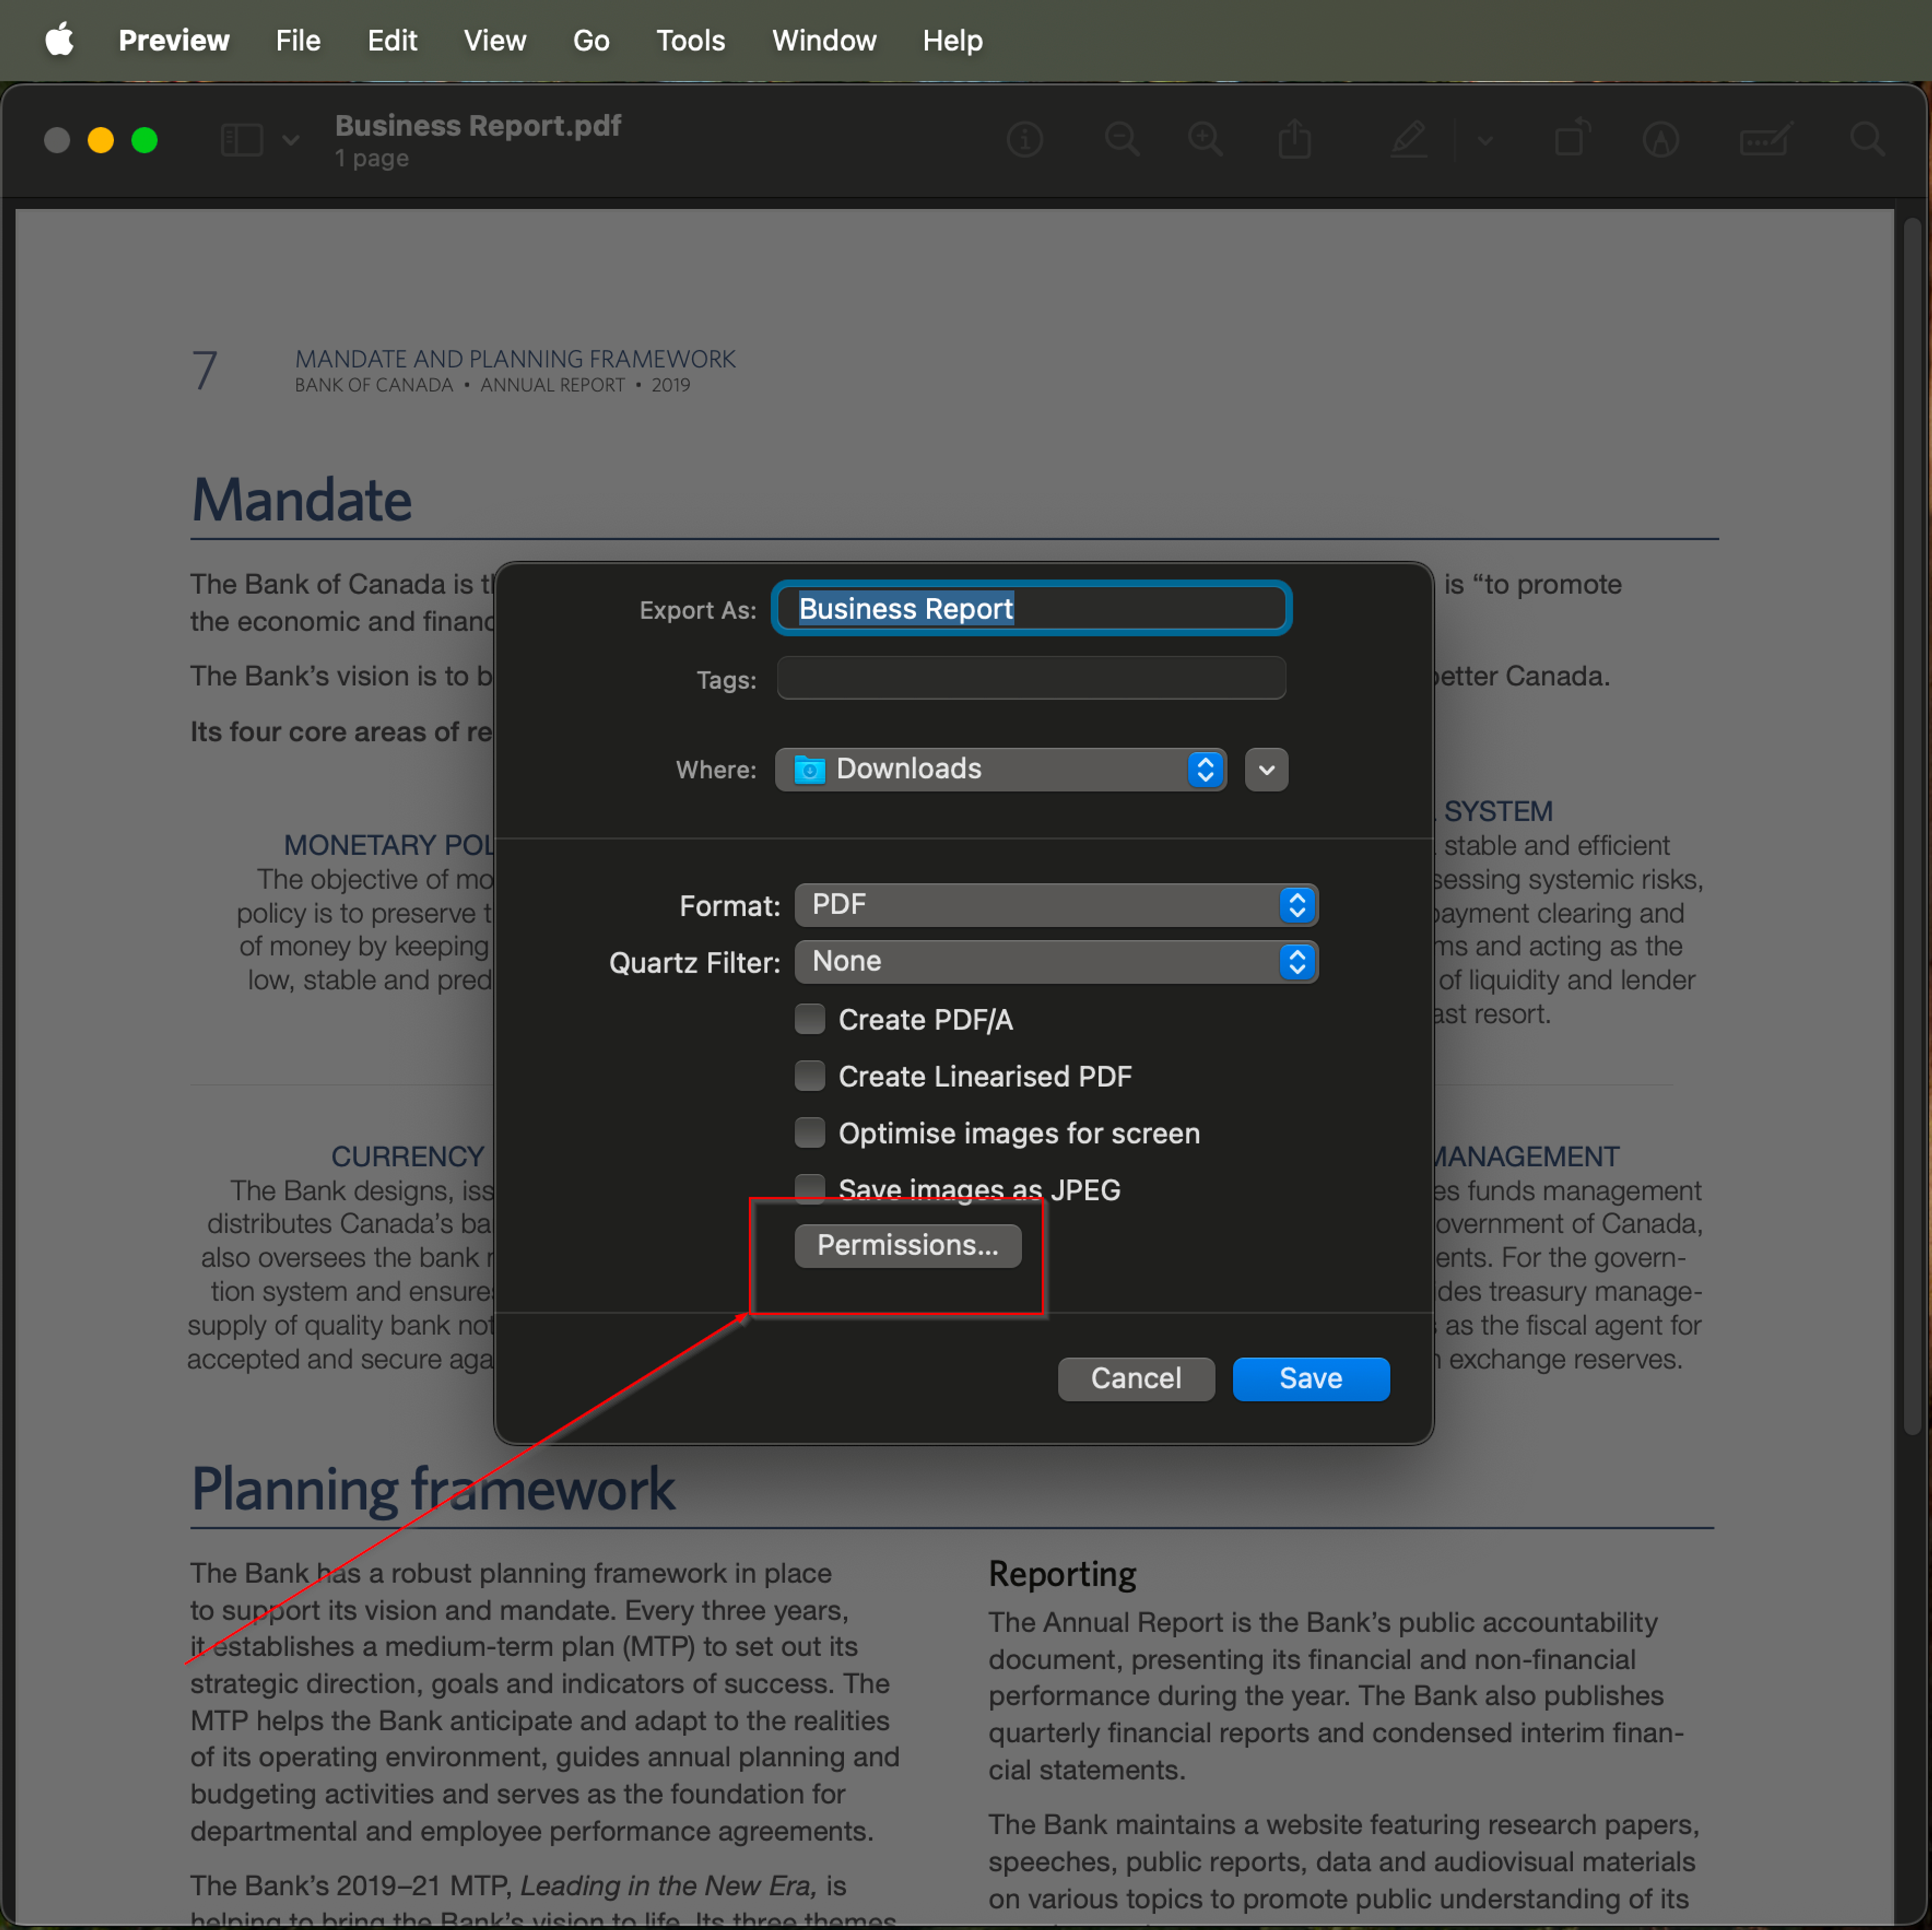
- Access the export menu.
In the menu bar, click File and choose Export. If you don't want to protect the original PDF, enter a new name for the password protected copy.
- Set your password.
In the export dialog, click on the Permissions... button, then select Require Password To Open Document. Enter a strong password and verify it. This password will be required to open the file.

- Restrict printing or copying (optional).
To restrict printing or copying, set an owner password. According to Apple Support, this option lets you control if others can modify or print your PDF document.


- Click “Apply," then save.
Preview will create a new, password-protected copy of your original PDF in the location you selected.
After saving, close and reopen the locked PDF file to confirm it asks for a password.
How to edit or remove passwords in Preview
To change or remove your password, open the protected PDF in Preview.
Go to File > Edit Permissions.


From here, you can update the owner password, revise printing permissions, or remove the password entirely. Once saved, your changes will apply to the document.
Password protect a PDF using Xodo PDF Studio
Preview is convenient, but sometimes you need additional options like PDF flattening to lock annotations or form fields in place.
Xodo PDF Studio is a desktop PDF editor that helps you encrypt PDF files, restrict editing, and flatten content to make it harder to change.
Steps to add PDF password protection with Xodo PDF Studio
- Download Xodo PDF Studio.
Download and install Xodo PDF Studio on your Mac.
- Open your PDF file.
Launch the software. Then go to the File menu and choose one of the Open options (From Computer, From URL, or cloud storage).
- Go to security settings.
In the top toolbar, click Secure and choose Document Security. This opens the password and permission management options.
- Set a password to open the PDF file.
In the dialog, click on Edit to add a user password that will be required to open and view the document. Choose encryption level (RC4, 128 AES, 256 AES). Enter and confirm your password.


- Specify permissions (optional).
To control editing, data extraction and printing, you can set permissions password. You can allow or disallow people to print, extract text and graphics, fill forms and sign, and modify document.
- Flatten the PDF if necessary.
If your PDF file includes layers or annotations, use the flatten tools (left side pane) to lock those elements into the file. This helps prevent unwanted changes after sharing.

- Save your protected copy.
Select Save or Save As to generate create a new version of the PDF. Verify that your password and flattening settings are applied.
When you reopen the password protected document, it will prompt for a password if you set one. To update permissions settings or change the password later, return to the Secure tab in Xodo PDF Studio.
FAQs
Is there a way to lock a PDF from editing without a password?
You can disable editing by setting a password in Preview or Xodo PDF Studio. If you want to restrict changes without requiring a user password, read how to protect a PDF from editing without a password.
Does password protecting a PDF encrypt it?
Yes. When you apply a password in Preview or Xodo PDF Studio, the PDF file is encrypted using standard security protocols.
What’s the difference between a user password and an owner password?
A user password is required to open the PDF. An owner password controls what someone can do with the file (like printing or copying text). If you only set a user password, anyone who opens the file can still modify it unless you also apply an owner password.
How do I update or remove the password later?
In Preview, open the PDF file and go to File > Edit Permissions.
In Xodo PDF Studio, open the Secure tab and select Document Security to change or remove passwords. Save the file after making updates.
Does Mac automatically encrypt my PDF if I save it to iCloud?
iCloud uses encryption during storage and transfer, but this doesn’t replace password protection on the file itself. To prevent unauthorized access, it’s best to apply a user or owner password directly to the file.
Can I password protect a PDF on Mac without Adobe software?
Yes. Both Preview and Xodo PDF Studio let you secure PDFs without using Adobe Acrobat. For more options, see our guide on how to password protect a PDF without Adobe.
How do I protect a PDF on Mac so I can open it on my iPhone?
Password-protect the PDF file in Preview or Xodo PDF Studio, then send it to your iPhone. When you open it, you’ll be prompted for the password.
For device-specific instructions, check out how to password protect a PDF on iPhone.
Choose the right tool for your workflow
Password protecting PDFs on macOS is simple once you know your options.
Use Preview for quick tasks like restricting access or printing. Choose Xodo PDF Studio when you need advanced features like flattening, permission control, or offline editing.
If you often work with contracts, client data, or financial records, extra security options in Xodo PDF Studio can save time and reduce risk. Plus, its cross-platform support makes it easy to manage protected PDFs across your Mac, iPhone, iPad, or online account.
Try both methods and see which fits your workflow best.


Related Articles

How to Protect a PDF from Editing Without Password
Want to share PDFs without letting others edit them? Learn how to protect PDFs without passwords using Xodo PDF Studio securely on your desktop. Set permissions, flatten files, or convert pages to images and keep your PDF documents readable and secure.

How to Password Protect a PDF without Adobe
Skip the cost and complexity of Adobe Acrobat. Password protect your PDF files with Xodo PDF Studio. Manage file permissions, apply best practices and keep your sensitive documents secure. Simple, affordable, and all securely offline on your desktop.

How to Preflight a PDF with Xodo PDF Studio
If you are preparing a PDF for print or professional export, perform a PDF preflight check first. It reviews your document for issues that could cause output problems. Check out our guide as we walk you through how to preflight a PDF in Xodo PDF Studio with beginner tips for a professional print job.


