 PDF to Word
 PDF to Excel
 PDF to HTML
 PDF to Text
 PDF to PDF/A
 PDF to PowerPoint
 PDF to JPG
 HEIC to JPG
 PDF to PNG
 OCR Converter
 Word to PDF
 JPG to PDF
 Excel to PDF
 PDF Converter
 PNG to PDF
 PowerPoint to PDF
 DICOM to PDF
 Merge PDF
 Split PDF
 Delete Pages
 Rotate PDF
 Rearrange PDF
 PDF Editor
 Crop PDF
 DOCX Editor
 Edit PDF Text
 Compress PDF
 Sign PDF
 Redact PDF
 Fill in PDF Forms
 Flatten PDF
 Annotate PDF
 ASK PDF
 PDF Compare
 PDF Viewer
 Office Viewer
 Text Compare
 Validate PDF/A
How to Remove Box Around Text in Microsoft Word
Aug 22 2025
MS Office


6 min
Share this post
Learn how to remove visible boxes around text in Microsoft Word. Discover simple methods to clear formatting, delete text box borders, and restore clean, professional-looking text.
Ever opened a Word document and noticed boxes wrapped around your text? It’s a common formatting issue.
These boxes can appear for different reasons, maybe someone added borders manually, used a text box, or applied a style that includes outlines. Whatever the cause, they can make your document look cluttered or unprofessional.
Getting rid of these unwanted boxes is possible. While different types of boxes require different removal methods, you can clean up your document with ease.
This guide walks you through several ways to get rid of Microsoft Word text boxes, including:
- Using border settings
- Using the clear formatting option
- Using text box options
- Managing the text after boxes have been removed
- Answers from related questions
Follow along step by step and get your text looking clean and professional.
How to remove box around text in Word
There are three common ways to remove boxes around text in Word, depending on how they were added. Use the method that matches your formatting issue.
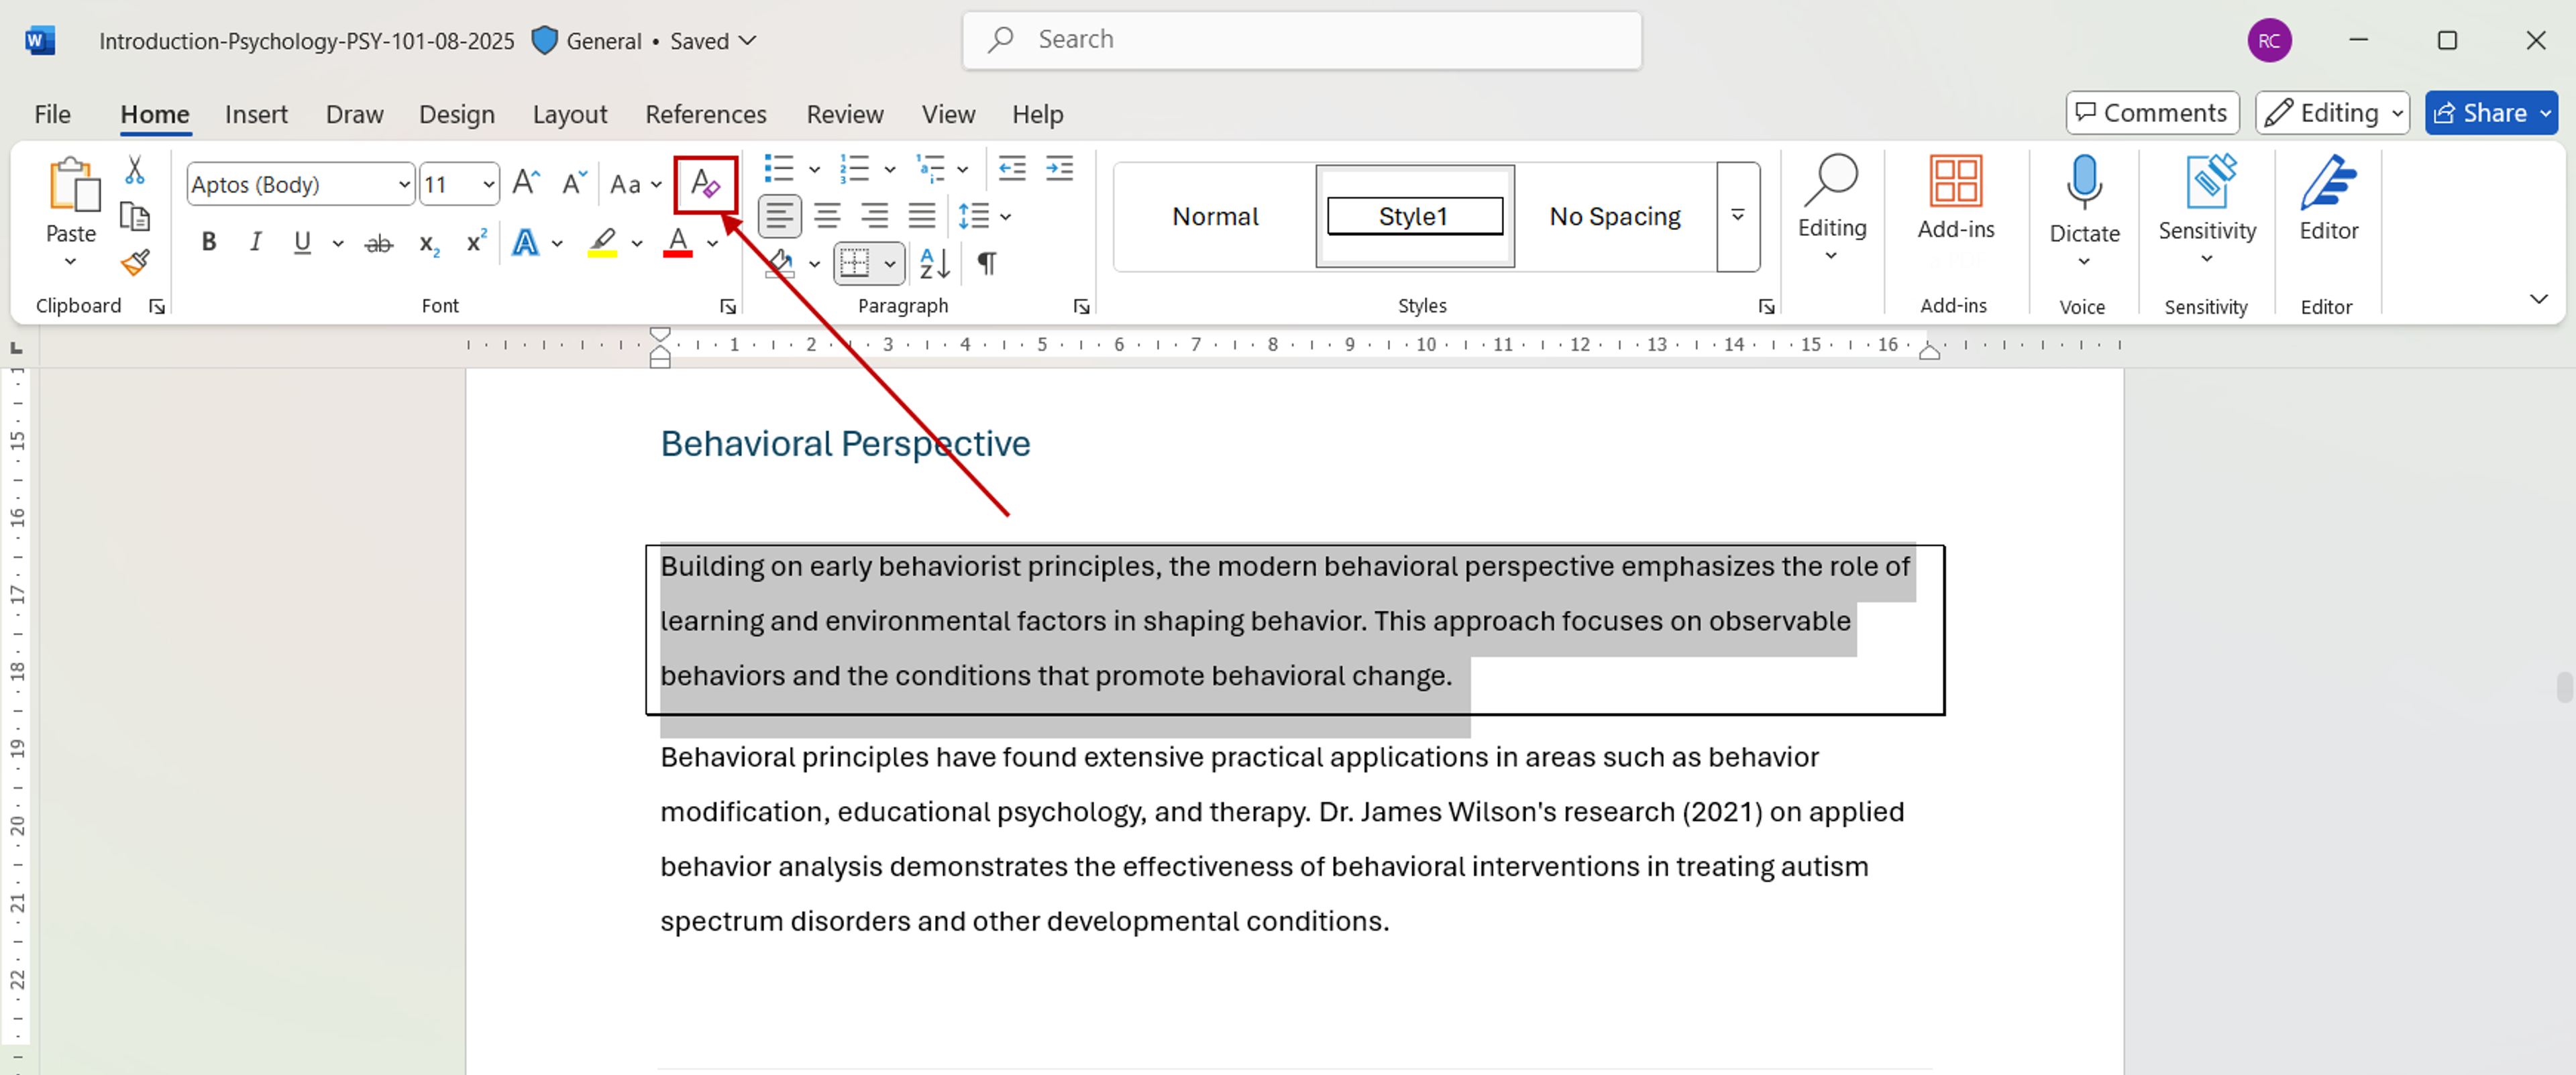
Remove a Box Using Border Settings
Sometimes Microsoft Word places a border around a paragraph because of a style or manual border formatting.
Follow these steps to remove that border:
- Select the text with the visible box.
- Go to the Home tab.
- In the " Paragraph" section, click the down arrow next to the Borders icon.
- Choose Borders and Shading... from the dropdown.
- In the dialog box, go to the Borders tab. Under Setting, select None.
- Click OK to apply the change.
- Save your document.


If you have multiple boxes around text that have been created with borders, you can remove them all by selecting all or some of them first and performing the above steps. Note that all highlighted text will lose the paragraph border.
Remove a box using the “Clear Formatting” option
A box can be generated by applying a formatting style that includes a border. To remove a style-generated border by clearing existing formatting:
- Highlight the text box.
- Go to the Home tab.
- Click on the Clear All Formatting button (shown as an eraser icon in newer Word versions).
- Check the text again to confirm that no border remains.
- Save the file to your device.

You can remove all the style-generated text box elements in your document, select them all and proceed to clear them of all formatting with the above steps.
Note: This method removes all formatting, including bold, italics, and colors, so use it only if you’re okay with resetting the text style.
Remove a box using "Text Box" options
Adding a box from the shape menu can also create a box around words. In such cases, removing the shape or converting to plain text is a good solution.
Here's how to remove the text box border without losing the text:
- Select the text box by clicking its edge.
- Go to the Shape Format or Drawing Tools Format tab.
- Click Shape Outline.
- Click on No Outline to remove the border around the box.
- Save the file to your device.


To remove multiple text boxes, select them all and repeat the steps. If you only want to remove some, select each one individually.
Pro Tip: You can also convert a text box to plain text:
- Right-click the box border, choose Cut, then paste the text into a regular paragraph.
- Or, copy the text and paste it into a new blank paragraph.
What to do after removing boxes from text
Once you've removed the boxes, take a moment to review how the text fits into the rest of your document.
In some cases, those boxes were used to highlight content or control layout. If you still want to emphasize certain elements, here are a few clean alternatives:
- Use bold or color to highlight key stats or phrases instead of a box.
- Adjust alignment or spacing to improve layout in multi-column formats like newsletters or brochures.
- Insert captions or notes near images using plain text formatting instead of floating text boxes.
- To add images to your document, follow the steps in our guide on how to insert pictures in Word.
If you're working with others or need to make quick edits without Microsoft Word, try using Xodo’s online DOCX Editor. You can remove formatting, and make last-minute changes right in your browser.
Frequently asked questions
Why is there a border around my paragraph?
Borders can appear if a paragraph inherits formatting from a style or template. This often happens when using pre-set styles that include borders.
To check, select the paragraph, go to the Home tab, and click Borders and Shading to see if a border style is applied.
Will I lose my text if I remove a text box?
No. Removing a text box or its border doesn’t delete the content inside. Microsoft Word retains the content when the text box style or the border is removed.
Why is the shape still showing after I removed the border?
Some shapes have a fill color or shadow effect that stays visible even after the border is removed. To hide the shape completely, go to the Shape Format tab and set the fill to No Fill.
Can I remove designs added by a style?
Yes. Styles can add borders or other formatting to headings and paragraphs. To remove them, go to the Home tab, find the Styles section, and switch to a style like Normal that doesn’t include borders.
How do I add a border back after removing it?
To reapply a border, select the text, go to the Home tab, and click Borders and Shading. Choose your preferred line style, color, and thickness, then click OK to apply it.
Create more professional-looking Word documents
Deleting unwanted boxes around text in Microsoft Word is easier than it looks. Whether they came from borders, styles, or text boxes, you now have the tools to delete them without affecting your content.
These small fixes can make a big difference in how your document reads and looks. With fewer distractions and cleaner layout, your work becomes easier to follow and more professional.
Open up your next Word file and give it a try.


Related Articles

How to Add Page Numbers in Word
Struggling with unorganized Word documents that are hard to navigate? Our guide shows you how to add page numbers with ease. Learn how to add, customize, and manage page numbering, and make your documents more professional and easy to follow.

How to Double Space in Word
Tired of hard-to-read paragraphs in your Word documents? Learn how to double space like a pro! This complete guide covers toolbar and paragraph options, as well as keyboard shortcuts and steps for online option with Xodo DOCX Editor.

How to Insert a Picture in Word
Tired of boring, text-heavy Word documents? Learn how to insert a picture in MS Word like a pro! This step-by-step guide covers Microsoft Word, Xodo’s online DOCX Editor, plus expert tips to make your docs visually stunning and professional.


