 PDF to Word
 PDF to Excel
 PDF to HTML
 PDF to Text
 PDF to PDF/A
 PDF to PowerPoint
 PDF to JPG
 HEIC to JPG
 PDF to PNG
 OCR Converter
 Word to PDF
 JPG to PDF
 Excel to PDF
 PDF Converter
 PNG to PDF
 PowerPoint to PDF
 DICOM to PDF
 Merge PDF
 Split PDF
 Delete Pages
 Rotate PDF
 Rearrange PDF
 PDF Editor
 Crop PDF
 DOCX Editor
 Edit PDF Text
 Compress PDF
 Sign PDF
 Redact PDF
 Fill in PDF Forms
 Flatten PDF
 Annotate PDF
 ASK PDF
 PDF Compare
 PDF Viewer
 Office Viewer
 Text Compare
 Validate PDF/A
How to Create a Hanging Indent in Microsoft Word
Apr 7 2025
MS Office


4 min
Share this post
Discover how to create a hanging indent in Microsoft Word using the built-in ruler or paragraph settings. Perfect for formatting reference lists, bibliographies, and citations.
When formatting a document in Microsoft Word, one of the most common tasks is creating a hanging indent.
Whether you're working on a bibliography, reference list, or an academic paper, a hanging indent is a helpful formatting tool that sets the first line of a paragraph in place while indenting the following lines.
This quick guide will walk you through the simple steps to add a hanging indent in Microsoft Word
What is a hanging indent?
A hanging indent is a style where the first line of a paragraph is flush with the margin, and the second and subsequent lines of the paragraph are indented. It’s widely used in citation styles for academic writing, making it essential for properly formatting references.
How to create a hanging indent in Microsoft Word
Follow these simple steps to add a hanging indent in Microsoft Word:
- Select the Text: Highlight the paragraphs you want to apply the hanging indent to.
- Open Paragraph Settings: Right-click on the selected text and choose Paragraph Options from the context menu.
- Choose Hanging Indent: In the Paragraph dialog box, select Hanging from the Special dropdown menu.
- Apply the Indent: Click on OK to apply the hanging indent to your selected text.

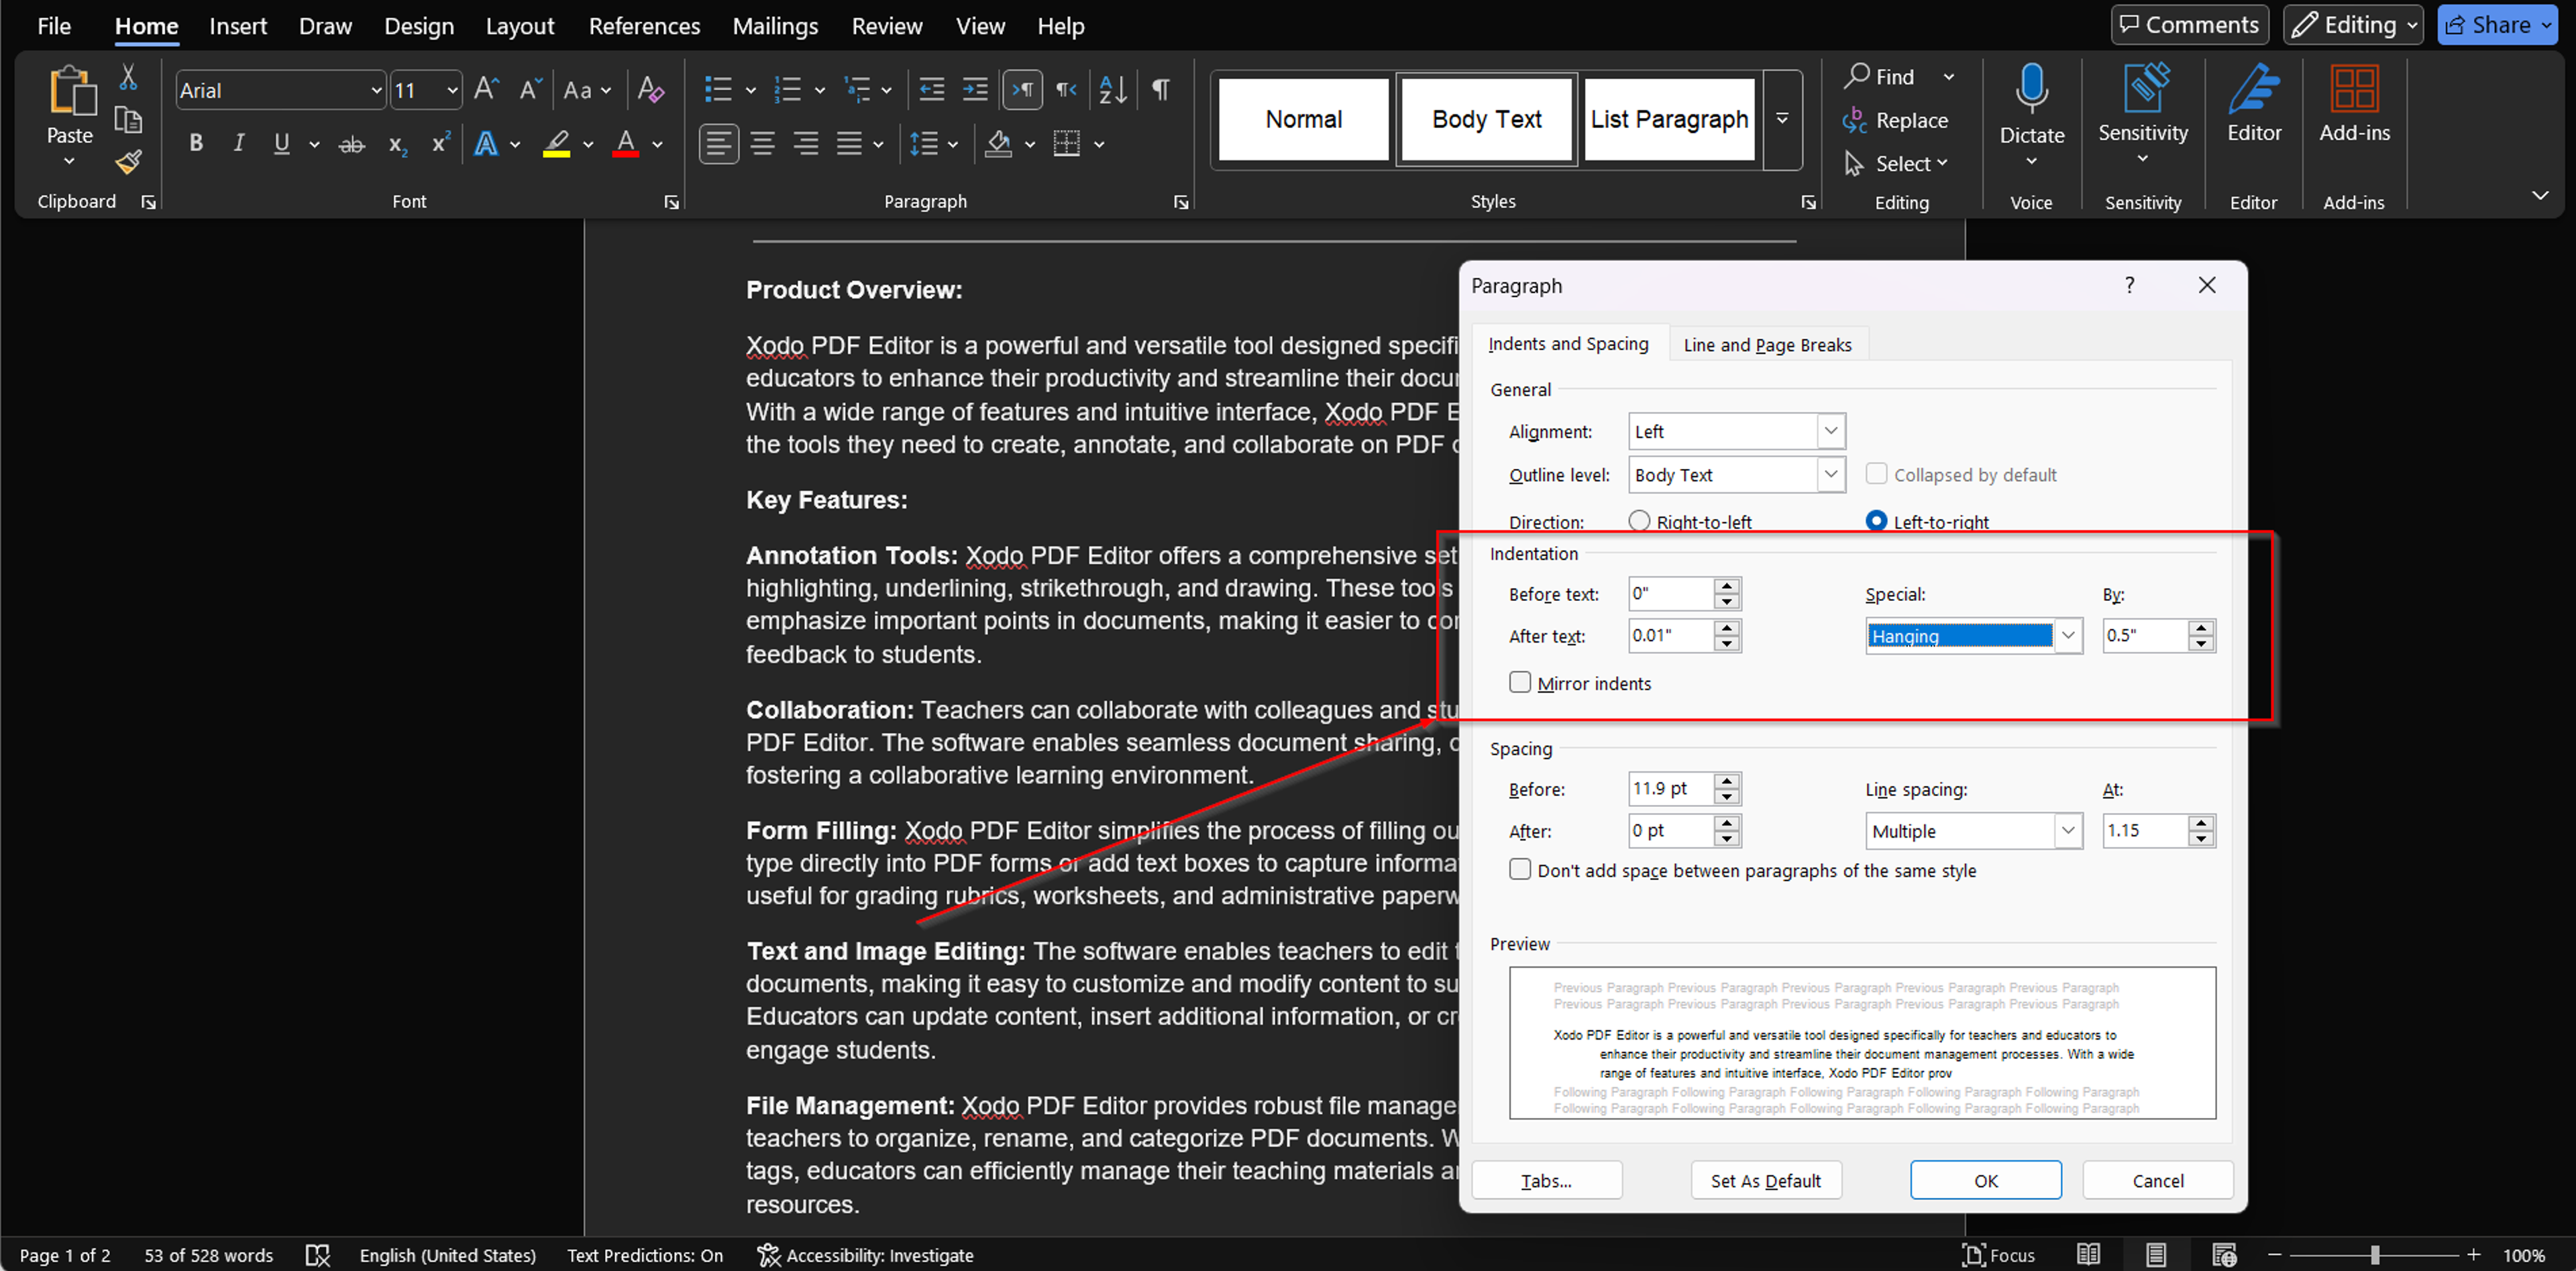
By default, the hanging indent is set to 0.5 inches, which aligns with the standard for most citation styles, such as APA and MLA.
You can adjust the depth of your hanging indent by changing the measurement in the By field under the Special section. If you prefer a larger or smaller indent, simply type in the desired value, such as 0.75 inches or 1 inch.
Once you’ve applied the hanging indent, you can easily edit and format your Word documents online directly in your browser with Xodo’s Word Editor.
How to set a hanging indent using the ruler in Microsoft Word
Here’s how to use the ruler to set a hanging indent in Microsoft Word:
- Enable the Ruler: Go to the View tab and check the box for Ruler to display the ruler at the top of your document.
- Select the Text: Highlight the paragraph where you want to apply the hanging indent.
- Adjust the First Line Indent: On the ruler, locate the First Line Indent marker (the small triangle) on the left side and drag it to the 0-inch mark.
- Set the Hanging Indent: Next, drag the Hanging Indent marker (the small rectangle) to your desired position, typically at 0.5 inches.


Using the ruler to set a hanging indent provides a more visual method for formatting your document, making it easier to see and adjust indents on the fly.
If you're also looking to further improve your document layout, check out our guide on how to remove page breaks in MS Word for seamless editing.
Why Use a Hanging Indent?
Hanging indents are essential in academic and professional writing, especially when you need to format reference lists or bibliographies.
Citation styles like APA, MLA, and Chicago all require hanging indents to properly format sources.
APA (American Psychological Association), MLA (Modern Language Association), and Chicago are widely used citation styles in academic writing.
- APA is commonly used in the social sciences and focuses on author-date citations.
- MLA is often used in the humanities, emphasizing in-text citations with author-page numbers.
- Chicago is versatile, offering two formats: Notes and Bibliography (for history and humanities) and Author-Date (for sciences).
Each style has specific rules for formatting references, citations, and papers, helping maintain consistency and clarity in academic work.
Please note that after formatting your references, if you need to remove text or show deletions, you can strikethrough text in Word to indicate this edit.
Whether you're writing an essay, preparing a research paper, or creating a bibliography for a project, using the right indent style ensures that your document adheres to the required formatting standards.
Frequently Asked Questions
Now let's break down some common questions from people who want indented text after the first line of the paragraph.
How do I create a hanging indent using a Mac?
To create a hanging indent in Microsoft Word on a Mac, start by selecting the paragraph you want to format. Next, go to the Format menu, choose Paragraph, and select Hanging from the Special dropdown. Finally, adjust the indent size if necessary to achieve your desired formatting.
Can I remove a hanging indent if I no longer need it?
To remove a hanging indent in Word, open the Paragraph dialog box, select None under the Special dropdown, and click OK to reset the indent to the default setting.
Is it possible to create a hanging indent for a specific part of my document?
Yes, you can apply a hanging indent to a specific section of your document. Simply highlight the paragraphs you want to format and follow the steps above to adjust the indent just for those sections.
Are hanging indents common in business writing?
Hanging indents are more common in academic writing, particularly for reference lists and bibliographies.
In business writing, they are less frequently used, though they can be applied in specific cases like legal documents, contracts, or any content that requires consistent and clear formatting for lists of references or resources.
Generally, business writing focuses on clarity, conciseness, and practicality, and traditional formatting like bullets or numbered lists might take precedence over hanging indents.
Are there online guides to help me use Microsoft Word?
Yes, there are many online guides available to help you use Microsoft Word. For instance, Xodo offers various helpful tutorials on editing and managing Word documents.
Explore Xodo’s resources for an easy-to-follow approach for working with Word documents:
- How to Clear Formatting in Word
- How to Delete a Page in Word
- How to Remove Links from a Word Document
- How to Remove Comments in Word
- How to Compress Word Documents
- How to Find and Replace in MS Word
Conclusion: Creating A Hanging Indent in Word
Now that you know different ways for creating a hanging indent in Microsoft Word, you can easily format reference lists, bibliographies, or any document that requires this style.
Microsoft Word offers simple tools, like the ruler and paragraph options, to help you customize your document’s appearance.
For additional tips on editing and formatting Word documents, check out Xodo’s tutorials or Microsoft’s support portal.


Related Articles

How to Add Page Numbers in Word
Struggling with unorganized Word documents that are hard to navigate? Our guide shows you how to add page numbers with ease. Learn how to add, customize, and manage page numbering, and make your documents more professional and easy to follow.

How to Add Footnotes in Word
Need to add footnotes to your Word document? Learn to insert, format, and manage citations for academic essays, legal docs, and business reports in MS Word. Our guide covers APA, MLA & Chicago styles with step-by-step tutorials. Check it out!
How to Convert Docx to Doc
Learn how to work with older versions of Microsoft Word by converting docx to doc. Ensure your documents are backwards compatible, whether you're transitioning between MS Word versions or need to edit docx files on the spot. Our guide has you covered.


